
Celery is an asynchronous task queue based on distributed message passing. Tasks are executed concurrently on one or more worker servers using multiprocessing, Eventlet or gevent. Tasks can execute asynchronously (in the background) or synchronously (wait until ready).
Architecture:

Fig1 : Celery architecture
The main part of this architecture is the broker (transporter), which handles all the task processing.
The client sends tasks to the broker, and the broker uses round robin to distribute those tasks to workers.
Setup and Installation:
1. Broker/Distributor:
We can use RabbitMQ or Redis as a broker; Celery has full support for these two brokers.
But here I am going to use RabbitMQ for the setup.
First of all, install RabbitMQ on the broker machine.
RabbitMQ is available for both platforms, Linux and Windows; you can use either.
After installation, we have to configure the broker machine so that clients and workers can connect to it.
Configuration:
- Using rabbitmqctl command, run the below commands
[In windows, you can find it here C:\Program Files\RabbitMQ Server\rabbitmq_server-3.6.6\sbin]
- rabbitmqctl add_user <user_name>
- rabbitmqctl add_vhost <vhost_name>
- rabbitmqctl set_permissions -p <vhost_name> “.*” “.*” “.*”
- rabbitmqctl restart
The above commands will setup a user and virtual host with full permissions on the broker machine.
Now, install the Celery package in Python on the broker machine.
You can directly install Celery using the below command.
pip install celery
Your broker machine is ready; let’s move towards the worker machines setup.
2. Workers:
Install the Celery package on the worker machines as well.
Now, we need to implement connectivity between the workers and the broker.
Here, I am following the below project structure for the worker machine.
distributor [name of project directory]
|—– celery.py
|—– tasks.py
You can add the below celery.py in the project directory (distributor) for the connectivity.
from __future__ import absolute_import, unicode_literals
from celery import Celery
app = Celery('distributor',
             broker='amqp://<user>:<password>@<ip>/<vhost>'),
             backend='amqp://',
             include=['distributor.tasks'])
app.conf.update(result_expires=3600,)
if __name__ == '__main__':
    app.start()
Here,
user - user name of broker machine that we have created
password - password of broker user
ip - IP of broker machine
vhost - virtual host of broker machine
distributor.tasks - distributor is the name of our project directory and tasks is the name of the Python file where we are going to add our tasks.
In tasks.py, we have the following simple Celery task.
from __future__ import absolute_import, unicode_literals
from .celery import app
from celery.utils.log import get_task_logger
from celery.backends.amqp import AMQPBackend
import time

log = get_task_logger(__name__)
@app.task(backend=AMQPBackend(app, url='amqp://'))
def add(x,y):
 log.info('Calling task add(%d, %d)'%(x,y))
 print('I am in task add')
 z = sum(x,y)
 return z
def sum(x, y):
 time.sleep(10)
 return(x+y)
You can add any Python function as a Celery task which you want to execute on multiple worker machines at the same time.
We have created the worker configuration and worker tasks; now it is time to start the worker.
To start the worker, we need to execute the following command from the project directory.
celery -A distributor worker -l info
Here,
celery - command
distributor - project directory
-l info - for logging option
After execution of this command, the worker will connect with the broker and always be ready for task execution.
You can set up multiple workers on the same machine with the following command.
worker1(cmd) : celery -A distributor worker -l info -n worker1%n
worker2(cmd) : celery -A distributor worker -l info -n worker2%n
If your tasks are difficult or take a lot of time, then it is better to have a single worker per machine.
Now we have broker and worker connectivity.
You can add any number of workers (depending on your tasks) to the broker with the same procedure and same configuration explained above.
3. Client:
We have a ready-to-use distributed architecture with broker and workers.
You can run the client on any machine to send tasks to the distributed system (broker and workers).
For demo purposes, I have the below client.
Add this script as client.py in the project directory (distributor) and run it.
from distributor.tasks import add
import time
task_ids = []
for i in range(20):
 print('Running : %d'%i)
 id = add.delay(5, i)
 task_ids.append(id)
for i in range(len(task_ids)):
 while not (task_ids[i].state == 'SUCCESS'):
  continue
 print(str(i) + ' : ' + str(task_ids[i].get()))
That’s it.
If you are having a big task which is running on single machine and takes too much time then you can make it distributed and reduce lot of time.
Monitoring:
For real-time monitoring of distributed architecture, tasks distributions, active running workers, active broker, you can install flower python package.
Flower is a web based tool for monitoring celery clusters, you can install it using simple following command.
pip install flower
After installation, you can run the server using following command.
flower -A proj --port=5555
Now, you can visit this URL http://localhost:5555 for monitoring celery clusters.
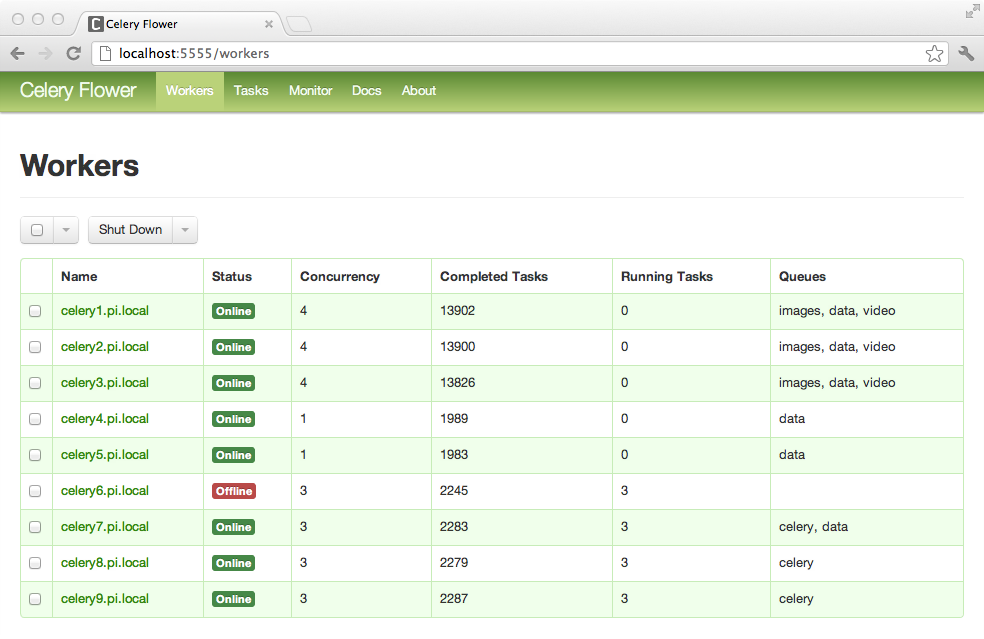
Fig2 : Celery Flower